Setting up a Windows Network for Business
Windows Networking Types
Windows Homegroup
There are three general types of Networks deployed by contemporary Windows Operating Systems which would be considered Windows 7 and later. Most computer purchases involve price point computers where the assumed customer will deploy the computer into a Home Network. These 'price point' computers generally deploy a low level networking technology called HomeGroup designed to be used within a family unit where all network users are assumed to be trusted. HomeGroup networks are generally associated with entry level Windows Operating Systems, the Windows 'Home' Operating Systems. In early 2018 updates to Windows 10 (Version 1803) removed the Windows HomeGroup as a networking technology. The link below offers information from Microsoft on this change.
HomeGroup removed from Windows 10 Version 1803 April 2018
Windows Peer to Peer Network
A second type of network, an entry level 'Business Network' is often referred to as a Peer to Peer Network. In a Peer to Peer network, each computer is master over its local resources so other computers across the network that want to access these resources must present some sort of credential which is checked by the 'server' computer to decide whether or not to grant access to the networked computer. This is an important distinction to understand, in a Peer to Peer network we begin to have more configurable security, but this security is managed independently by each local computer. When a networked computer connects it must present a credential that is approved by the local computer before network access is granted. A Peer to Peer network works best in small networks of 5 or fewer computers. A Peer to Peer network can be configured with Windows 'Home' operating systems, but an upgrade of about $100/computer to a Windows 'Pro' operating system provides access to more configurable security and additional business tools. The deployment of 'Windows Pro' operating systems is the starting point for Business Networks where employees come and go and not all employees should have access to all the resources of the system.
Windows Domain
The third design, a design used by Small to Corporate Level networks with 5 to thousands of computers is a Domain. In a Windows Domain, a dedicated 'Server' computer manages User Accounts and Group Policies across all the computers through Active Directory providing a unified interface for configuring User security and Group Policy across all Domain computers. Microsoft recommends a Domain architecture for business networks of about 5 or more computers. In a Domain, each local computer has its own security configuration, but the proper setup is to provide most security and user account configuration configured at the Domain level so that it applies to all computers in the domain.
| HomeGroup Advantages | HomeGroup Disadvantages |
|---|---|
|
|
|
|
| Peer to Peer Advantages | Peer to Peer Disadvantages |
|
|
|
|
|
|
| Domain Advantages | Domain Disadvantages |
|
|
|
|
|
|
The first step in setting up a business network is to form a plan for which computers will host resources that will be shared on the network. Decisions need to be made based on which users/computers need access to resources on the network and how much control they should have over the Files/Folders in the Network Shares.
You will also need to set up user names on computers, it is recommended that these names be set up around work 'roles' rather than using personal names. This makes it easier to manage changes when an employee leaves the business and is replaced by a new employee. If security is necessary after the changeover you can simply modify the password on the impacted computers rather than add a new Windows User.
Each computer will need to have a User Account set up as an administrator and should be password protected. In a Peer to Peer configuration this User is often a different name on different computers making it difficult to know which
It is important that the administrator User and Password be recorded and put into a safe place in the event that a serious problem occurs and it is necessary to regain control of a computer. This is generally much easier to do over time in a Domain system as there is an administrative account that can log onto all Domain computers.
It would be wise to hire a Network Professional to assist in planning and deploying the network.
There are a number of settings that are important in setting up an entry level Business Network. The following are recommendations.
1) Configure all computers to reside on the same network ID. For Client computers and other network resources that are not 'Shared' on the network, a network address provided by DHCP will generally suffice. For Computers who host network shares it is recommended that you use Static IP addresses. The same is true for Ethernet/Wireless based printers that are shared by multiple computers. The use of Static IP addresses for computers that host network shares and ethernet based printers prevents them from changing IP addreses as a result of changes with DHCP. Over time, DHCP will invariably assign different IP addresses to your network resources which can result in temporary or permanent loss of the network resource.
2) 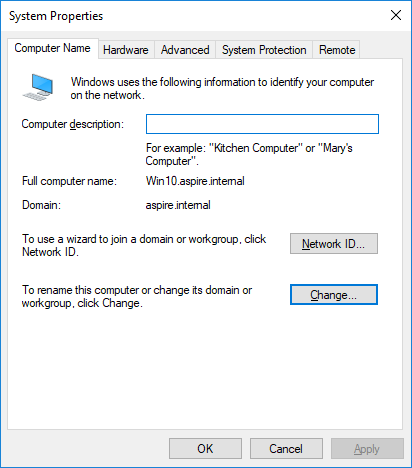 To facilitate the 'Browser Service', an older technology, configure all computers to belong to the same Workgroup. The default for Windows 'Pro' operating systems is 'Workgroup'. You can leave the default or change the name to something more memorable. To change the Name of the Computer or Workgroup open the System applet from Control Panel. Click on the 'Change...' button to configure the Workgroup.
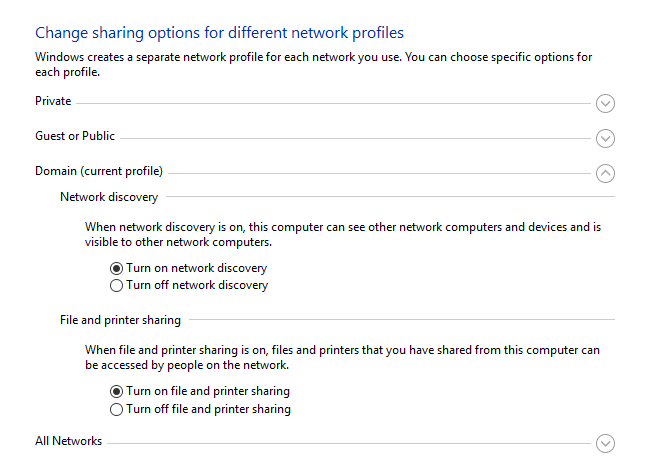
3) Configure the 'Network Location'. For each network connection, Windows sets up a set of rules for network communication depending on what type of Network that Windows determines you to be on. There are two main choices a Private or Domain configuration which is designed to facilitate to allow shared resources on the network, and a Public configuration which needs to be more secure. Think of a Public configuration as what you would want in a Coffee Shop with a Laptop. You will be connecting to the same logical network as other computers/smart phones in the area, but you want the resources on your computer to be inacessible by others. You can check the current configuration by going to the Control Panel Applet Network and Sharing Center and then click on Change Advanced Sharing Settings. Notice that the Current Profile is Domain. For a business network where computers need to access and share resources, it is critical that all computers be set to be in either the Private Profile or a Domain Profile. The Public Profile will prevent effective network communications.
For either the Private or Domain profiles, make sure that the 'Turn on network discovery' and 'Turn on file and printer sharing' options are selected as shown below.
4) For computers that are going to act as File Servers, create a directory structure that organizes the data that you want to share. This would generally be best if placing new folders that are going to be shared on the network into the root directory of the drive rather than under the My Documents folder of a particular User. For CoffeeRoaster and FishWare, Aspire recommends creating the following folder structure:
a) C:\Aspire\
b) C:\Aspire\Aspire Data\
The C:\Aspire folder is used to host application and support files but is not shared on the network. The C:\Aspire\Aspire Data\ folder is shared on the network and is used to host files and folders that need to be accessible to other computers.